|
|
|---|

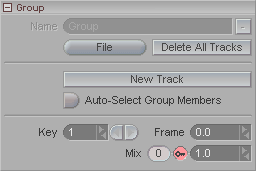
The Group block lets you give custom names to each group and keyframe its "strength"-- the degree to which it will be used.
Name: Give the group a name using this field. Make sure it's a clear and concise name.
File (pulldown): Load and save performances from here. A performance is the complete set of Tracks and Clip Instances for this Group. If you look at the Compose List, the performance is everything that is a child of this Group.
Auto Select: When this is on, any time you select a Group in the Compose List, all items in that group will be selected. This is similar to the Auto Select feature on the Groups sub-tab (here and in Setup). With that one, any time you select a member of a group (in the World View or Item List or the pulldown list) it will select the whole group; with this feature it does the same thing, but it's based on selecting a Group in the Compose List (Tracks List).
Key: This shows which keyframe is currently selected for the Mix value. This is not a frame number, it is a reference to the number of keys. For example, if your first keyframe is at frame 0, then that is Key 1. If your next keyframe is at frame 30, that is Key 2.
Frame: This shows which frame the current keyframe is on. It's also a quick way to move a keyframe; just enter the frame that you want the current frame to be on.
Mix: This sets how much the Group and its contents should be used. For example if this is set to 0, then the Tracks, Blends, and Clip Instances for this Group will not be used, and if it is set to 1, then it will be used at full strength. You can keyframe this number to do simple blends between tracks, or even leave it at less than 1 (100%) to let another track be "seen" through it.